
Creating DIY projects and gardening are two of my favourite hobbies. I’m sure that you enjoyed my post DIY Easy Fairy Garden and you probably have seen many DIY videos where people are using a repurpose technique to bring inexpensive flair to their gardens. That’s because it works! Repurposing old wood, doors, pallets, barrels, windows, etc. can also save you lots of money. A little sanding and spray paint and you can change a pallet into raised bed gardens or even a vertical plant holder.

DIY Monogram Succulent Planter
My latest project is this gorgeous DIY Monogram Succulent Planter. You can use any type of wood that you can find to create this project.
Items that you will need:
- 1- 1×4 Piece of Wood
- Large Thin Wooden Letter
- Pencil
- Measuring Tape
- Tacks
- Drill
- Hammer
- 1 ½-Inch Wood Screws
- Handsaw or Miter Saw
- Succulents
- Soil
Directions:
The size of the planter will depend on the size of the wooden letter you purchased. If you prefer, you can definitely make your own letter by buying some backer board. Use your measuring tape and your pencil to make straight lines on the board. Then use the handsaw or miter to cut the letter out. If you bought a wooden letter, the first step is to measure every side of the letter. For example, if you are using a “T”, measure along the top and the sides of the cross, and then measure the lower part of the cross. You will then need to measure the sides and the bottom of the stem. You should have a total of 5 measurements if you are using a “T” .

DIY Monogram Succulent Planter
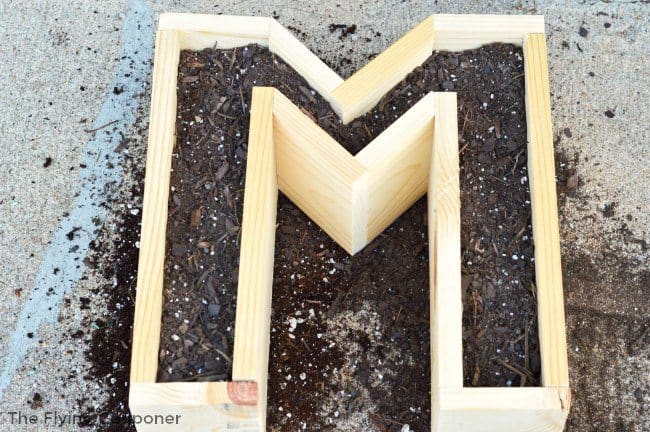
Using the 1×4 piece of wood, measure and cut out all pieces. The lengths are going to depend on the measurements of the wooden letter you purchased. Also, the number of pieces of wood you will need is going to depend on the letter you chose. For our DIY Monogram Succulent Planter the letter “M” will need ten pieces of wood.

To assemble the pieces of wood, lay the letter down. Put the pieces on top so that it all connects to make a 3D version of the letter. Start screwing one piece of wood at a time until the letter box is finished. Be sure to check your work by laying the pieces back together while you are assembling. Doing this will allow you to keep everything lined up with the wooden letter. If you are slightly off, it’s okay, adding the bottom will align everything.
Once the pieces are assembled, flip the letter box and place the letter on top of it. Use the hammer and tacks to attach the letter to the box.
Before planting, make sure to sand your DIY Monogram Succulent Planter and paint or stain it. Next, fill it with soil, add your beautiful succulents and you are done! Isn’t it beautiful? Definitely an amazing project that will add a lot of character to your home or yard.
What was your latest DIY project? We definitely want to know all about it!
You might also like these posts too:

I love creating new home decor projects with treasures that I find at flea markets and thrift stores. These vintage doorknobs along with a piece of pallet were all I needed to create the perfect DIY rustic jewelry hanger.


This is such a cute idea. It would be so nice in our backyard AND my last name starts with an M! 😉
oh my gosh! i absolutely love this. what a beautiful idea. I will have to keep this planter in mind for next spring
Wow what an awesome idea! I love this so much.